|
|
Classic and Creative
Princess Cake Ideas

Pin It
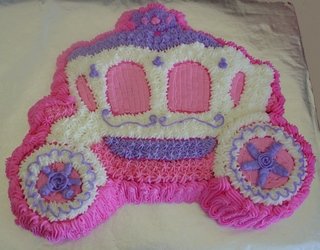
One easy princess cake that is sure to delight party guests is a carriage cake. Using the star-shaped tip makes decorating this cake easy. However, you have the opportunity to add variety and texture to the cake with different decorating tips.
To make the carriage princess cake, follow these simple instructions. Decorating ideas and instructions often come with the cake pan, so look for them.
Supplies needed:
- Princess carriage cake pan
- Cake mix (one layer)
- Wilton Cake Release
- Cake board
- Foil wrap (optional, but it looks great)
- Cake turntable or small lazy Susan (optional, but really useful)
- Wilton decorating tips #3, #5 and #16 (#21 optional if you want to add a bigger shell border) and couplers for the tips
- Disposable decorating bags (easiest) or parchments (cheapest)
- 4 to 4 ½ cups of buttercream icing
- Icing colors of your choice (recommended colors violet, light pink, dark pink, white)
- Small amount of cornstarch used for smoothing icing
Directions:
- Generously grease the carriage princess cake pan with Wilton Cake Release. Do not skimp on this step or your cake may not come out of the pan in one piece.
- Mix and bake your favorite cake recipe or prepare cake mix according to package instructions.
- When the cake has finished baking, cool in pan on a wire rack for 10 minutes. Next, place wire cooling rack on the top of the cake and turn the rack and pan over so the cake falls out of the pan onto the rack. Let the carriage cake cool completely.

- After the cake is cool, place a cutting board on top of the cake and turn the board and the cake over so the carriage cake grooves are face down. Place the cutting board on the turntable. With a sharp knife cut the “belly” of the cake off. This will allow the cake to lie flat on the cake board. Immediately turn the cake back over.
- Prepare the cake board. Cut the board to the desired shape and size. If you cut the board, trace the cake pan on the board, leaving 2 inches around the edge. Cut board with an exacto knife. Cover the board in foil wrap. Measure the foil wrap leaving an inch all around and fold over the edge.
- Place the cake on a wire rack. Place the wire rack on a cookie sheet.


- Make a thin glaze to lightly cover the entire cake. This will keep the cake from drying out and will make it taste better.
Tip: Take a tub of any ready-made frosting and microwave for 15-20 seconds. Stir. The frosting should be in liquid form. Pour onto the cake and move and tilt the cake so the frosting spreads and covers the entire surface. Let the frosting harden again for about 15 minutes before decorating.
- Mix the buttercream frosting and tint the frosting the colors you have decided. The project goes much faster when all the frosting has been colored before you start decorating.
- When the glaze on the cake is dry, place the cake on the cake board. You may put a little frosting on the bottom of the cake to secure it in place. This is an optional. The cake is unlikely to move if the cake board remains level.
- Using tip #3, begin outlining the carriage, windows, trim and inside wheels.
- After outlining the windows and inside wheels, make rows of lines to fill the shape. Leave as it is for a more textured look, or for a smooth finish, pat down with a finger dipped in cornstarch.
- Using tip #16, fill in the carriage with stars. Follow the pattern or use your own colors.
- Make the wheel spokes with tip #5.
- Next, use tip #3 to make the wheel centers, and the swirls and scallops on the carriage. Add dots, shapes or words onto the princess cake to personalize it to the birthday girl.
- Finally, using tip #21, make scallops on the sides of the cake to finish it all off.
Congratulations on a wonderful carriage princess cake. This is an easy birthday cake to decorate, but you can be creative and add additional decorations to add texture and dimension.
Go from Princess Cake
to Princess Party Ideas
Go from Princess Cake
to Pretty Princess Party Ideas Home
|
|
|